")
So, do you want to verify your WordPress site on Pinterest? For verifying your website on Pinterest will be neat features like Pinterest analytics, and ads program, stats for the photos, and many more.
For any kind of WordPress help, likely to be containing the installation issue or any other fact, you can call us at Toll-Free No: +1 888 614 0555. We are always there for you.
Further on – Let’s get flawed to the same…In this article, we will show how it’s so easy to verify your WordPress site
Why it’s must verify your WordPress site on Pinterest?
It’s must verify your WordPress site on Pinterest because that is one of the most popular social media platforms to share photos, visual content, videos. That allows you to create an account and to manage your images like an Instagram or Flickr.
That it also allows other users to collect the websites, links and other visual content by the creating boards.
That if you are running on a photography website that is any other type of blog with have images and videos and Pinterest can be an important source of traffic.
Verifying your website on Pinterest helps you learn more about your visitors that are using Pinterest analytics. And you will be able to participate in their ad program and plan for a strategy to grow your Pinterest traffic. so, let’s take some look for easy to verify your WordPress site on Pinterest.
Verify the WordPress site on Pinterest
Firstly, you’ll need to upgrade your profile for a business account. And this will allow you to use all their tools analytics, ads program, and many more. The Pinterest business account is free and so easy to set up.
Step1. To Upgrade Your Pinterest Account to Business
Firstly you should log in to your Pinterest account and click on the three dots at the top of the right corner of your screen. That will show you an upgrade now button.

If you click on this button, it will take you to the business account setup page. That you will need to enter your business name, and website URL, and then select a business type.

And you have to enter and you filled the information, and then click on to continue button, and your personal account that will be upgraded to the Pinterest business account.
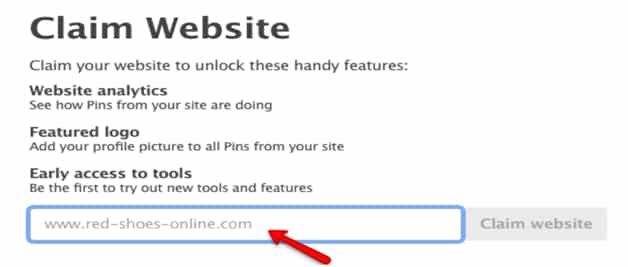
Step 2. Then claim your website on Pinterest
Claim your website, and go to the three-dot menu from the top of right corner claim your website, you need to go to the three-dot menu from the top right corner again and click on Settings.

On this page, you have to need to head over to the claim website section in the left menu that you enter your website URL.
Click on the claim website it will display two methods that you have to use and then claim your website (HTML tag or HTML file).
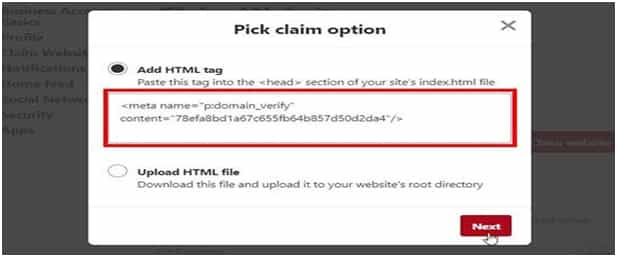
Then we are choosing the HTML tag and the option because it is easier. That you can also download the HTML file and upload it to your website’s root directory and using an FTP client.
Step 3. Add HTML tag in your WordPress site
There are multiple ways to add the HTML tag for your website’s header, but we will only cover the easiest methods.
First methods, when you have the Yoast SEO plugin installed on your WordPress site, then you can visit SEO The social page from your WordPress admin in an area.
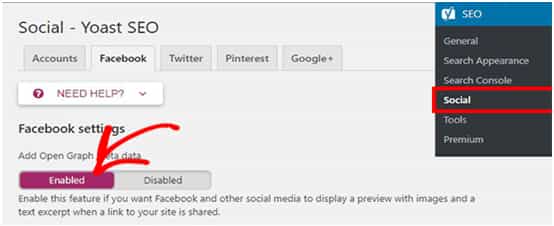
Under the Facebook tab, you will need to make sure that open graph settings are enabled. Then next you need to go on the tab of Pinterest. In the Pinterest confirmation field, that you should paste the HTML tag that you copied on previously.

If once you are done this then click on the save changes button. And if you are not using the Yoast SEO plugin, then you need to install and activate to insert headers and the footers plugin. Then the next step.
Activation, you need to go on settings> insert headers and footers page in your WordPress admin. The scrips in the header you should paste the HTML tag and then click on the Save button.

When the HTML tag is added in your website’s header section, and you need to go back for the Pinterest screen and then click on the Next button in the popup. And that will now ask for confirmation to send your site for review.

This process may take some time and after that, you get an email of verification of your website. When it’s done, you’ll see that the confirmation of the claim website section for Pinterest.

Verification is done, and then you can use the Pinterest tools like analytics, ads program, image stats, and many more. And you can also put the Pinterest pin-it button on your image blog so that the visitors can share your photos on Pinterest boards.
Conclusion
People who stuck on verifying the WordPress site on Pinterest In this article, we will show how it’s so easy to verify your WordPress site. I hope this article will be helpful for them and follow these steps of verifying WordPress site on Pinterest. If you like this article, don’t forget to share it with your peers.
Read More:- How To Install WordPress In Cpanel
 in Adults and Babies")


 in Adults and Babies")


